Pages

Monday, August 27, 2012

Dresser Makeover

My Mother in law brought us two dressers when she came to visit recently. Previously, I had mentioned we needed some, and she happened to have two in the attic. This one was my husband's in high school. It was spray painted silver, which totally went with his tye dye/smiley face room. Ha! 
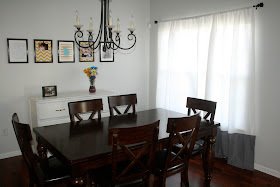
I decided to use this dresser as a buffet in the dinning room as I needed storage for the girls art supplies and place mats. 
I wanted the pull to be in the middle of each drawer, so it would look less like a dresser and more like a buffet. We used wood filler and it worked awesome! 
First, I sanded the drawer, and then applied the filler. It took a few applications and a day in between each to dry. Then I sanded the whole thing. Thank heavens for electric sanders! 
I applied one coat of primer; looking back it probably needed two since the wood was really dark. 
Then I used 2 coats of white semi-gloss paint. Some of the drawers were hard to open and close so my husband sanded the inside of the dresser and I rubbed a bar of soap on all the area's that touch the drawer. It worked like a dream! 
I used a piece of sand paper to distress the edges. I bought the pulls at Lowe's. It cost a little over $20 for all six. 
I love the way it turned out! 
I want to steal it for our bedroom, but we need the storage in the dinning room. 


Check out where I'm linking up! 

Friday, August 24, 2012

Goodwill FInds

 The girls and I went to Goodwill this afternoon. We actually found some great stuff! I am so excited! 
I found Salmon colored New York Company crop pants for $1! I also found a cotton slip for $1. I am going to refashion the slip to fit for my three year old. She loves wearing slips, and the one she has is too short. It's probably an adult size extra small or small. I found this rocking chair bench for $4.50. Both the girls can fit on it together. It's super sturdy. I am going to paint it. I'm not sure if I will keep it in one of their room or the living room. 
I found a large embroidery hoop for $1.50. 
The two wicker baskets were $2 a piece. The large one will be for DVDs and remotes. I think I am going to spray paint it black. The smaller one will probably be used for storage in one of the bathrooms. 
I think I got a great deal! All of this stuff for $12!!! 


Monday, August 20, 2012

DIY Curtains Made from Shower Curtains


After two curtain exchanges I decided to make my own! I needed matching curtains to put up on the living room and dinning room windows. They are both on the same wall, that's why I needed them to match. I bought panels at Ross and ended up needing three panels instead of two on each window, but there were no more left when I went back. The same thing happened at Marshall's. 
I went to target and found these white shower curtains on sale for $12 each. I bought 4 of them. 
I wanted my curtains to hit the floor so I knew I needed some material to add to the curtains. I needed them to be 20 inches long and they had to be the width of the curtains. I ended up getting 4 yards of gray cotton from Joann's. I had a 50% coupon, so it cost a little under $10. 
I had exactly the right amount of fabric, no extra at all! 
So the first thing I did was fold over the button hole part of the shower curtain and sew it down. I used this to hang the curtains on the rods. I bought my rods for $9.99 each at Ross. 
After I cut my gray fabric I laid it at the bottom of the curtain. I left a little extra on the sides, around 2 inches. Then I pinned it, and sew it to the curtain. 


I am not a fan of sewing huge pieces of material. So instead of hemming the sides and bottom of the gray cotton I used heat n bond! It saved my sanity! And it was so easy! 
This is where that extra 2 inches of material comes in handy. Just follow the heat n bond directions. Iron on the tape, peal it back, fold it over, and iron again. Then you have the perfect hem!
I needed a little over one roll of heat n bond. I made 4 curtains, so if you only have two to make one roll should be enough. 


I think the hem line looks much better than if I would have sewed it. 
I love the finished product!! 
I still wish it would have been cheaper, but it turned out great! 
Here's the run down on the cost: 
2 rods from Ross- $20
4 fabric shower curtains- $50
4 yards of fabric- $10
So around $80 for the finished product. 
I guess it's still better than those $30 a panel curtains though. 


Check out my linky party friends!: 

Friday, August 17, 2012

Giveaway for a Good Cause

                   I was reading some of my favorite blogs when I found Leann's post. Here is part of it:            


Giveaway for a Good Cause

My heart was heavy when I heard the news that one of my close family friends lost his beloved wife, Sharla, early yesterday morning while they were on a family vacation to go to Disneyland.  She passed away suddenly in her sleep and her poor husband is now left with their five young children, 3 girls ages five and under, and twin baby boys only seven months old.  I can't begin to imagine the heartache and grief they are experiencing.  I couldn't stop thinking about what a huge void her passing is in this sweet family.
A memorial fundraiser has been set up on behalf of the family in order help with funeral costs and to try and ease the burden that is now on the shoulders of this young husband.  In order to help promote and raise funds for this important cause, I am doing a giveaway one of my Lavender Striped Boyfriend Cardigans.  


Please go to Leann's blog Elle Apparel to read the rest of the post. Any donation is appreciated!!

DIY Fabric Blind

This black shade was over our back door when we moved in. It's horrible!
I don't even know what type of material it is. It was constantly falling off, and permanently wrinkled. I decided to replace it. I bought this material at fabric.com with the material I bought for my 
Here's what I did to make the blind: 
 I laid the black material over my yard of fabric. I cut around the material leaving enough left over on the edges to hem. I added a strip of yellow fabric to the bottom, then another strip of the patterned fabric. This made the blind long enough. The yellow also added a pop of color. I love the way it turned out. 
I sewed the pieces of material together and hemmed the sides and bottom of the blind. 

I hemmed the bottom wide enough to slip the existing piece of wood in. This puts weight on the end of the blind to hold it down. It was already in the black blind. 
I attached the blind with double sided tape ( I know super sturdy, haha!) So far I've had no problem. I tried hot glue and it would not hold. I will eventually find something more permanent.

It's working great, and I love how it turned out! It matches the decor of the room perfectly.


Check out where I'm linking up:

Shabby Nest, At The Picket Fence, The Shabby Creek Cottage, Johnny In A Dress, A Glimpse Inside, Hubby Made Me, The 36th Ave, 
Craftionary, Sumo's Sweet Stuff, Skip To My Lou, Sew Can Do, I Should Be Mopping The Floor,
Common Ground, Krafty Kat, Not Just A Housewife, Vintage Wanna Bee, Sweet Little Gals,
Sew Much Ado, My Girlish Whims, Southern Lovely, Someday Crafts, Some What Simple,
Six Sisters Stuff, Too Much Time

Wednesday, August 15, 2012

Fall Looks

I don't know about ya'll, but I'm ready for fall! I'm so over this summer heat and humidity! I love wearing jeans and cardigans. I always feel slimmer in jeans and a cardigan.
  Cardi's are great for covering up those 'left overs'.
  
I am pretty boring when it comes to color in my fall/winter wardrobe. Last year almost everything I wore was grey or some shade of purple. Hopefully this year I will have some more color.
It's still in the 90's here! 
I'm so excited for Fall! It will come one day! 


 I could live in the this long comfy cardigan, don't worry I wouldn't leave the house in it. 

I just think this ring is pretty. 

This skirt would be easy to make using LeAnn's maxi skirt tutorial. I am totally addicted to maxi skirts now. They are so comfy! I've made three using LeAnn's fabulous tutorial. 
I think I need those boots too!


Here is another fall look I love! I just love these colors. Obviously, they are the same as the colors I've used in my family room and bedroom found here and here. 
This look represent my style pretty well. First off it has grey, and I love the pop of color!

Here are my favorite places to shop for myself:
Ross, TJ Maxx, Marshall's- I usually find all of my tops here, and they have great prices on boots and handbags.
Forever 21- I love their accessories! I also love their $10.50 skinny jeans, you can't beat that price! 
Last year I bought a few cardigans and tops their too, man I guess I just love Forever21! The only problem is that some of the clothes are too small for me, so my selection is limited. Obviously they are geared toward the 21 yrs olds not the 27 year olds, but I still found some things that work for me. 
Target- I always check the clearance clothes and shoes. I love the kids section!
Old Navy- I used to buy all of my jeans at Old Navy, I wear longs and they always had my size. I'm not in love with the new fit of the jeans now, mostly because I have a lot more curves than I would like. That's what happens when you grow babies! Ah well, they have super cute kids clothes!

So there you have it. My thoughts on fall fashion. 


I do have a few tutorials I'm getting ready to share, I promise! I just sewed some curtains, made some wall art, and refinished a dresser. Be sure to check back : ) 

Now I want to go shopping!


Check out my linky friends!

Friday, August 10, 2012

Country Girl Purse made From Jeans


My sweet niece is turning 2 this month! I can't believe it! I wanted to make something for her birthday. I decided on a little purse. My youngest daughter loves hoarding carrying all her toys around in little bags. I figured my niece might like to do the same. 
I already had all of my supplies, yay for free projects!! I used the left over pant legs from my Jeans to Capri's Tutorial. The trim is from my Lace Sock Tutorial, and I had the ribbon in my stash. You can embellish your purse anyway you like, the options are endless. You can even make this purse using a hot glue gun instead of sewing. Just replace all the sewing steps with hot glue. Easy! This purse is perfect for a gift, or even to put party favors in. You can also monogram it with rhinestones and hot glue, or by using iron on fabric adhesive and scrap fabric. 

Here is how you make it:

Step 1- Cut your jean leg to desired length. Use the hem for the top of your purse. Turn inside out and sew or serge the cut end.
Step 2- Turn purse right side out.
Step 3- Cut ribbon (I cut my ribbon strips 14 inches each) Place and pin. Sew. You can see by the arrows where I sewed the ribbons on. The stitching will be covered up by the trim.
Step 4- Pin trim around the top of your purse, and stitch all the way around. 

Ta-da! You're done! This probably only takes 10 minutes! It's such a fast, inexpensive project! Now all you have to do is fill it up with goodies! 
This is another reason to save old jeans. Cut off the bottoms and make a batch of purses and you will be ready for the all parties your kiddo's will be invited to once school starts. Just add a coloring book and crayons and you have a cute inexpensive gift. 

Happy Sewing! 

Check out where I'm linking up: 

Thursday, August 9, 2012

Featured


Hubby Made Me

Check out where I'm being featured today! Britni has a really cute blog, take a look around! : )

Tuesday, August 7, 2012

PicMonkey


I thought I would share my favorite photo editing web site. PicMonkey is my favorite by far! There are so many fun things to do with your photo's. This collage shows a few examples of what you can do. My three year old saw the picture of her with the party hat and said, "Look! It's me at my birthday!" Haha! Funny girl. Take a look at this free site, and have some fun! 

Saturday, August 4, 2012

Hello!


Hey guys! I hope you have a fun weekend planned. I just got home from visiting family this week. I know we are all trying to get in as much summer fun as we can before school starts! 

Check out where I'm being featured this weekend. 

Sumo's Sweet Stuff

Take a look around Sumo's blog, I'm sure you will be inspired!