Pages

Tuesday, January 31, 2012

My Favorite Skirt

 I thought I would share my favorite skirt tutorial with you. This pattern is easy to follow, and takes less than an hour to make! You can find the tutorial here. There is also a little girl version; so fun! Yes my girls and I occasionally match at church. I did not wear a matching bow though! This is the perfect skirt for spring! So get a jump start on your spring wardrobe and make a few. I'm thinking about making another one in black and white.  
I love how it's high waisted, so it makes me look thinner (which is awesome!). It totally covers baby leftovers. The girls skirts have elastic in the waist, and they fit really well. I like the tucked in shirt look with these skirts. It was really hard to keep the girls shirts tucked for very long though. 
The adult version does have a zipper, but don't let that scare you! It's surprisingly easy! 
Here is the link for the pint sized version.

Saturday, January 28, 2012

Faux Leather Headband

I found this great tutorial at Ruffles and Stuff, This headband is super cute and easy to make.
 Disney has tons of great projects. I love her fresh and girly style!
I got my faux leather at Joann's in the sale isle. I think it was around $6 a yard, I got about 4 inches. It was really cheap, and I had plenty for this project. 


Friday, January 27, 2012

Blue Flower Tee

This is my first shirt made from scratch! If you count cutting it out of a size 4x turtle neck as scratch. I think that's pretty close! I bought this shirt for $1 a year ago, I was planning to use the material to make knit baby pants. I bought a couple of these sweaters and made a few pants for baby showers. I found this left over piece the other day, and decided to make myself a new top. 

 I used a shirt I already had to make a pattern. I bought this black Gap shirt for probably $3 on clearance. I loved the way it fit, till I accidentally put it in the dryer. Now it's too short, which is a problem I have a lot. I'm tall and I don't want my leftovers stomach showing. Plus nobody likes having a crack attack, so long shirts are the way to go! 
First I used tissue paper to write on and traced around the sleeve. 
 If you look hard you can see the word FOLD on my pattern, don't forget to cut on the fold! 
 I could have used more tissue paper to cut the body of the shirt out, but I decided to just lay she shirt directly on the turtle neck. I remembered to leave several inches at the bottom since I wanted a longer shirt. I did not cut off the hem of the shirt, this way it's already hemmed! 
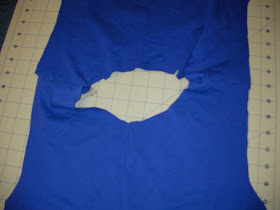
 I cut the body of the shirt out, remembering to fold the sleeve in and cut around what would be the armpit area. 
 So here is what it should look like. 
 I folded the top piece of material over to cut the neckline out. 
 I used my black tee as a pattern for the scoop of the neck. 

 Then I pinned the shoulders together; remember to place the material pattern side inwards. There is no pattern on this fabric but I am using the shirts original hem so I don't have to hem it. So I made sure that was facing the right direction. Then I zig zag stitched the shoulders. 
 I then cut my two sleeves out using the left over long sleeves of the turtle neck. 
 This is what it should look like now. 
 Then I pinned the sleeves on. Remember to pin on the wrong side of the material. See how you can see the stitching from the shoulder seam. I folded my sleeve in half and lined it up with the shoulder seam and pinned it. Then I worked my way down each side. Now sew it together. 
 Flip it over and you made a sleeve! 
 After you admire your work flip it back inside out. Pin down the sides and the underarm area. (I know you're enjoying my fancy pattern talk, hah!) 
 Sew down both sides, and you're done! You just made a shirt! 
I decided to shorten my sleeves a little bit. I decided not to hem the sleeves or neckline. The great thing about knit is it does not fray!  I already used the existing hem, so I did not have to worry about that. 
 I wanted to add some embellishment to the tee. So I cut out five circles from the left over material. I used one circle as the base, and folded the others in fourths and pinned them down. I did this three times, obviously. You can make as many or as few flowers as you would like. 
 I sewed across each petal to the one across from it. I made sure I back stitched at the beginning and end, so they don't fall off my shirt in the wash. When you wash your shirt I would lay it flat to dry so your flowers are not all crazy. 
 After that I decided my shirt still needed a little something. I hand sewed three flat pearlized buttons to the middle of each flower. 
 I can't believe it turned out! I'm going to be making more tops for myself in the future for sure! 
Not bad for $1, huh! 
Excuse my squinty eyes and wrinkled forehead, the sun was in my face. Do you like my pageant pose? Yeah I'm not a very creative model. 


Thursday, January 26, 2012

Easy Lace Cardigan Refashion

Who loves cardigans? 
I do!
 I'm so glad they are in style right now. They are perfect for covering up what I call my "leftovers". Also known as loose flabby skin I did not have before mommyhood. Luckily this first picture totally conceals it. Yeah! 
I've had this red cardigan for probably five years. I've put it in the Goodwill pile a few times, but I always pulled it back out. I knew there was some way to jazz it up a bit. 
 I decided to add this sweet black lace Grannie gave me. Luckily lace is back in style too! 
 All I had to do was fold the top and bottom pieces of the lace under, and then pin it in place. I think it would also look really cute if I replaced the buttons with shiny black ones. 
 Then I used black thread to sew around it. 
 It's perfect for Valentines Day! 

Wednesday, January 25, 2012

Princess Peg Dolls


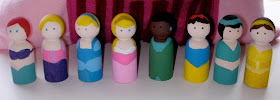
I found these adorable peg dolls on Pinterest. There is a tutorial here
I decided my baby had to have these for her third birthday.
What a fun present for any girl who loves princesses! 
I wanted to add some more detail to my dolls. I looked up pictures of each princess and picked a few dress and hair details. 
 I looked around online to see how much these dolls cost, but I couldn't find anything.
I ended up getting all my supplies at Hobby Lobby and the total cost was $9 and some change. If you have brushes and paint already you're set! The pegs are around $2-$3 for eight! 
 The acrylic paint set I bought was only $3 and I had more than enough paint to make all of these. I did buy a bottle of pink paint because pink didn't come in the set. I had to mix some colors to get the right shades. I used a pencil to draw the dresses and hair on the pegs first. Then I started with painting the skin color, then hair, and dresses. 

 I think they turned out so cute! After I took these pictures I sprayed them with a sealant so they look a little more finished. 
 I decided to make a princess castle pillow to hold all of the princesses. It's almost like a princess hotel. My towers ended up being too narrow, but I think it still looks similar to a castle. 
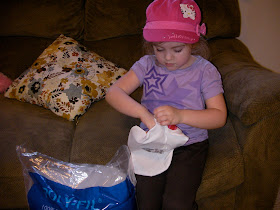
Here is my sweet birthday girl enjoying her gift! 
 Here are some close ups. 

Heart Pillow

My baby turned three this past weekend! It's so sad, no more baby! She's officially a big girl. No more diapers or pacifiers. 
My oldest daughter wanted to make her a birthday present and I thought a heart pillow would be perfect. I folded a piece of white cotton material in half, and drew half a heart on it with an fabric pen. The ink will disappear when you rub it with a baby wipe. I found my pen at Wal-Mart. 
Then I cut two hearts out. 

 I sewed around the heart and left a 4-5 inch opening. Then I flipped it inside out. 
 I used some scrap pieces of fabric to make some tiny hearts to attach to the pillow. 
I ironed on some Heat'n Bond and then drew hearts on it. I cut them out, and let my daughter arrange them how she wanted.


 She had a lot of fun decorating the pillow for her sister. Then I ironed the hearts on for her. 
 Then she stuffed the pillow, and I hand sewed the opening shut. 
 Here is a picture of little sister opening her gift. 

Monday, January 23, 2012

Easy V-Day Art

 For this project I used a frame that I bought at Goodwill. I spray painted it white. (it was in my daughters room till the glass was broke, don't ask.) Anyways, I didn't want to just throw it in the trash so I thought of this idea.

Here's what I used:
Picture Frame (without glass)
I piece of card stock
Four small pieces of felt

 I used the back of the frame as a pattern to cut out the paper. Then I cut out the word Love using a heart for the O. I then placed one letter at a time on the paper and sewed it with my sewing machine. Who knew you could sew paper!? 
I think the stitching adds a lot of character. So there you have it, and inexpensive piece of Valentine's Day art.